What is The Internet?
Earlier today, my sister entered the living room. She opened Spotify on her phone and started to play As It Was, by Harry Styles.
Despite standing in Athens, thousands of miles away from Spotify’s headquarters in Stockholm, the song began to play almost instantaneously. How on Earth did this happen?
The answer is stunningly complex. It involves millions of computers, servers, routers, and undersea cables working together across the globe. This vast physical infrastructure is what we call the internet. It’s a global network that connects devices and allows them to communicate.
Long ago, engineers developed rulesets – called “protocols” in computer networking – to standardize how data should be packaged, addressed, and sent across the internet’s infrastructure.
When you transfer a file across the internet, a protocol called FTP or SFTP is usually running under the hood. When you send an email, the protocol SMTP, IMAP, or POP is likely being used – all are protocols tailored to handle email transmission and retrieval.
When you open a browser, enter a URL, and press Enter, your computer uses a protocol called HTTP (Hypertext Transfer Protocol) to request information from another computer somewhere on the internet. The destination computer, using the HTTP protocol, will know how to interpret the request and send back a response.
People often use the terms “the internet” and “the web” interchangeably, but they’re not the same thing. The internet is the physical infrastructure – the global network of machines and cables – whereas the web is just one service built on top of it. When you visit a webpage, the web handles routing data to the right machines, retrieving the website’s files, and then structuring that content so the browser can display the page. It’s powered by the HTTP protocol.
This article focuses specifically on web interactions. I want to show you exactly what happens when you open your browser, enter a web address into the search bar, and see that site appear on your screen.
Step 1: User action (enters a URL into their browser and hits enter)
You open a browser and type in a web address, like substack.com. Then you hit enter.
Your browser begins a series of steps to locate and request information from another machine on the internet. This machine is called a web server.
A “server” is any computer or program that provides services or resources to other computers – called “clients” – over a network. A “web server” is a type of server that provides web content. It stores everything needed to render a website on your screen, such as files, code, and databases. It also responds to requests made by clients for those resources.
This type of interaction is called the “client-server model.” The client requests data or services, and the server responds to the request by providing the data or performing the service.
HTTP is the protocol used for this request-response interaction. Once a series of setup steps are complete, your browser sends an HTTP GET request to the server. This request asks for the homepage and all its associated resources.
Let’s examine the next step:
Step 2: URL Parsing
The browser will parse the URL to extract its components.
Here’s the URL we entered earlier: substack.com.
- Even though you typed
substack.com, your browser interpreted that as a request forhttps://substack.com/home. I’ll explain why this happened in a moment.
Let’s break down each component of the URL:
The Scheme
https is the scheme. The scheme is the part before the colon and slashes (: and //). It designates which protocol will be used to handle the data transfer between the client and the server.
For example:
http://example.com-> uses theHTTPprotocol (Hypertext Transfer Protocol)https://example.com-> usesHTTPS(This isHTTP, but with an added layer for security – theSstands for “Secure.”)ftp://example.com-> usesFTP(File Transfer Protocol)
“Wait a second,” you might be thinking. “You said earlier that HTTP is the protocol that powers the web. However, the browser says the scheme for our request to substack.com is HTTPS. What gives? Also, what even is HTTPS?”
Allow me to explain. I mentioned earlier that many protocols exist for sending data over the internet. When you use a browser to communicate with a web server, HTTP is used. It’s what your browser uses to say “Give me the homepage of substack.com” or “Submit this form data to the substack.com web server.” Any responses that come from the server back to the client use HTTP, too.
There’s a problem with HTTP: all the data sent over the internet isn’t encrypted. It’s in cleartext. If someone intercepted the data, they could see things like passwords, credit card numbers, and other sensitive information.
To address this vulnerability, HTTP is often paired with another protocol that adds a layer of security. That protocol is called TLS, which stands for Transport Layer Security. TLS encrypts the messages before they’re sent, so sensitive information can safely travel across the internet.
HTTPS (HTTP Secure) is HTTP working in conjunction with TLS (Transport Layer Security). HTTP is the core protocol, but TLS encrypts the data before it’s sent.
Even if the URL scheme is HTTPS, you still refer to the GET request as an HTTP GET request. This is because the request itself is still an HTTP request; it’s just encrypted by the TLS protocol.
Let’s return to why entering substack.com was resolved by the browser as https://substack.com/home. When you omit the scheme in a URL, most browsers will automatically assume that https is the scheme, because most modern sites use the HTTPS protocol by default for security.
If you don’t specify a particular page, like /about or /contact, the browser requests the default path, which in this case is /. The server at substack.com is configured to redirect the path / to /home, likely because they want the homepage experience to live there. Thus, entering substack.com is resolved by the browser as https://substack.com/home.
The Host
substack.com is the host. The host is a name that identifies the server (or group of servers) that holds Substack’s resources. It tells your browser which server to contact on the internet to fetch data.
The Path
/home is the path. The path indicates the particular resource you want to access, which in this example is the homepage for substack.com.
Side Note: Query Strings and URL Encoding
If you were to enter something into the search bar, like the writer Coleman Hughes, then hit enter, you’d see a URL in your browser’s address bar that looks like this:https://substack.com/search/coleman%20hughes?sort=relevance&page=1
https is the scheme, substack.com is the host, and /search/coleman%20hughes is the path. You might be thinking “what exactly is the %20 doing in the URL?”
Spaces aren’t allowed in URLs (remember that “coleman hughes” was entered into the search bar), so they must be encoded. This is called URL encoding. "coleman hughes" becomes "coleman%20hughes” when URL-encoded. This ensures the server correctly understands that you’re searching for a single string with a space in it.
?sort=relevance&page=1 is known as a “query string”. The query string starts at the ? character, and it includes any key-value pairs meant to pass information to the server. The first key-value pair is sort=relevance. The next key-value pair, separated from the previous key-value pair using the & symbol, is page=1.
sort=relevance tells the server to sort the results by relevance, and page=1 tells it to return the first page of the results. Even though I only typed in a name and hit enter, the browser helped send structured information to the server using the URL, thanks in part to the query strings.
Throughout the remainder of this guide, I’ll show you what happens when we just enter substack.com into the address bar. Query strings and encoding are important parts of most URLs, though, and I wanted to briefly cover them here.
Onto the next step:
Step 3: DNS Lookup
Let’s take a moment to consider where we’re at. We opened a browser, entered substack.com, hit enter, then saw that the browser resolved the URL to https://substack.com/home.
As I mentioned earlier, substack.com is the host. The host identifies the server (or group of servers) that holds Substack’s resources. It tells your browser which server to contact on the internet to fetch data.
When you type substack.com into your browser, it looks like you’re telling the computer exactly where to go. But in reality, this website name – called a “domain name” in computer networking – is just a human-friendly shortcut. Computers on the internet don’t understand names like substack.com.
All the machines on the internet locate and talk to each other using numerical identifiers. These identifiers are called IP addresses (Internet protocol addresses), and an example could be 151.101.1.195.
Before your browser can contact Substack’s server, it must figure out the IP address linked to substack.com. That’s where DNS – the Domain Name System – comes in.
Because it’s much easier for humans to remember names like substack.com than a string of numbers, DNS was created as a phonebook for the internet. It translates human-friendly domain names into machine-friendly IP addresses so that computers can locate and talk to each other.
Your browser will send a DNS request to a DNS server on the internet. The request says to the server “Hey, do you know the IP address for substack.com?”
The DNS server then searches its own database. If it knows the IP for substack.com, it tells your browser. Otherwise, it forwards the request to another DNS server on the internet. The process repeats until an IP address is returned to the client.
Note that the speed of this exchange depends on two key factors:
- Latency: the amount of time it takes for the data to travel to the server and back to the client.
- Bandwidth: the maximum amount of data your connection can carry at once.
These factors affect all communication on the internet – not just DNS lookups. Take the world of finance, for example: high-frequency trading firms make money by spotting tiny price differences between markets and acting faster than anyone else. They might buy a stock for $1.00 on one exchange and sell it for $1.01 on another, profiting from the difference in just milliseconds.
To gain an edge, these firms spend millions to physically place their computers as close as possible to a financial exchange’s servers. Why? Because the shorter the distance, the lower the latency. They also invest in high-performance cables to maximize bandwidth, allowing them to send and receive more data in less time.
Step 4: TCP Connection (and possibly TLS handshake)
Once the browser knows the IP address of the server it needs to contact, your computer will attempt to form a connection with that server.
If you have apps running in the background or are multitasking, your device may have formed connections with multiple servers already. It needs a system to keep those conversations from getting mixed up.
This is where ports and sockets come in.
Ports & Sockets
Imagine that you’re streaming music with Spotify, browsing Substack in a web browser, and refreshing your email application to see if there’s a new message.
All of this is happening simultaneously, but how does the computer keep track of these separate conversations with different servers? The answer is that each service – in this case Spotify, your web browser, and your email application – talks to the internet through a different port on your computer.
In the early days of networking, there wasn’t a reliable way for one computer to communicate with multiple applications on another computer simultaneously. The data from each application would mix together as it traveled from one computer to another, which crashed programs.
To solve this problem, engineers introduced port numbers: a way to label and separate different types of network traffic on the same device.
Think of your computer like a giant office building. The building has one street address (its IP address), but inside, there are lots of offices (each one is a port). One office might handle web browsing (port 80 or 443), another might handle email (ports 25 or 993), and another might handle streaming music (like Spotify on port 4070).
When your computer connects to another device over the internet, it doesn’t just say, “Hey, I’m sending a message to 151.101.1.195.” It says, “I’m sending a message to 151.101.1.195 on port 443,” which tells the receiving machine exactly which port should handle that message.
Let’s go back to the example we’re using throughout our article – accessing substack.com. When your browser determines the Substack server’s IP address via DNS, your computer then chooses a random, unused port – like 54123 – and combines the port with an IP address to create a socket.
A socket is an endpoint for communication on a device. It’s like a mailbox slot on your computer that’s ready to send or receive data. Your computer is saying “my socket for this interaction with substack.com's server is 192.168.1.1:54123. My IP address is 192.168.1.1, and the port I’m going to use as a ‘channel’ for the interaction between me and Substack is 54123.”
Now that the client has created a socket, it’s ready to attempt a connection to the server.
Let’s stop and consider where we’re at:
- We entered a URL into the browser and hit enter. The browser parsed the URL to determine, among other things, what protocol will govern the client-server interaction.
- A
DNSlookup occurred to figure out the IP address forsubstack.com. Your computer then chose a port and formed a socket (e.g.151.101.1.19:443). - Your computer is now going to attempt to connect to the server.
I wrote earlier that once all the necessary “setup steps” are complete, only then could the browser send an HTTP GET request to the server.
We’re still on the setup steps. Before the HTTP GET request can be sent, the client and server must establish a connection.
A separate protocol exists for initiating and managing the connection between the client and the server. This protocol establishes a reliable, ordered connection between two machines, and it’s called TCP (Transmission Control Protocol.)
It handles things like:
- Connection setup
- Data delivery guarantees (retries if data is not delivered)
- Correct sequencing of data
- Flow control and congestion management
Flow control is a mechanism that ensures the sender doesn’t overwhelm the receiver with more data than it can handle. For example, if a server is sending data faster than the client can process it, TCP will slow the sender down to match the receiver’s capacity.
Congestion management deals with traffic on the network itself. If too many devices are sending data at once, some machines positioned in the middle of the network can become overwhelmed. This leads to delays and data that is dropped entirely. TCP detects signs of congestion and automatically reduces the rate at which data is sent. As the network stabilizes, TCP slowly increases that rate.
While TCP is the most commonly used protocol for delivering web content, it’s not the only one available. There’s another protocol called UPD (User Datagram Protocol). Like TCP, UDP uses source and destination ports, which means it supports multiplexing – the ability to handle multiple simultaneous connections on the same device. However, UDP is designed for speed instead of reliability.
Rather than listing what UDP does, it’s easier to understand it by looking at what it doesn’t do:
- It doesn’t establish a connection before sending data
- Explaining how this happens is beyond the scope of this article. If you are wondering how this works, though, I suggest Googling it once you’ve finished reading this.
- It doesn’t guarantee delivery – some data may be lost in transmission
- It doesn’t ensure the data arrives in order – they may be received out of sequence
- It doesn’t handle flow control or congestion avoidance – it sends data as fast as the application allows
UDP splits up the data into units called datagrams, and fires each one off without checking if it arrives to the sender. Because of this, UDP is much faster than TCP. It’s ideal for use cases where speed matters more than reliability. Like:
- Livestreaming
- Online gaming
- Video chatting (like Zoom or Skype).
Here’s a table that compares the two protocols:
| Feature | TCP (Transmission Control Protocol) | UDP (User Datagram Protocol) |
|---|---|---|
| Connection setup | Yes (three-way handshake) | No (connectionless) |
| Reliability | Guaranteed delivery | Not guaranteed |
| Ordering | Ensures packets arrive in order | No ordering – packets may arrive out of sequence |
| Flow control | Yes | No |
| Congestion control | Yes | No |
| Speed | Slower due to overhead | Faster – minimal overhead |
| Use cases | Web browsing, file transfers, email | Video/audio streaming, DNS, gaming |
Substack uses the TCP protocol. Thus, when the client has its socket ready and attempts a connection to the web server, it uses the TCP protocol to make said connection. The connection itself is called a “TCP Connection.”
A TCP connection is initiated by what’s called a “TCP Handshake.”
TCP Handshake
In order to establish the TCP connection between the client and the server, the two devices must perform what’s called a “TCP Handshake.”
This handshake works like a quick introduction between the browser and the server. It goes like this:
- Browser: “Hi server, I’d like to start a conversation — are you available?” [
SYN] - Server: “Yes, I’m here and ready to talk — can you confirm?” [
SYN-ACK] - Browser: “Confirmed! Let’s begin.” [
ACK]
At this point, the server creates a new socket specifically for this conversation. From now on, both the client and server use their respective sockets to send and receive data. The TCP connection is now live.
Because the URL‘s scheme is HTTPS, there’s one more handshake that needs to happen before the GET request can be sent – the TLS handshake. This way, TLS can encrypt the HTTP data sent over the TCP connection.
TLS Handshake
Here’s a high-level overview of how the TLS handshake plays out:
- Browser: “Hi server! I support TLS version X, and here are the cipher suites I prefer.” [
ClientHello] - Server: “Cool. Let’s use TLS version X and this cipher suite. Also, here’s my digital certificate and public key.” [
ServerHello] - Browser: (verifies the server’s certificate) “Looks legit!”
- Browser: “Alright, here’s the info we’ll use to securely agree on a shared secret key.”
- Server: “Got it loud and clear. I’ll use this key for encryption from now on.”
Before proceeding, I want to take a closer look at the last two steps in that overview:
- Browser: “Alright, here’s the info we’ll use to securely agree on a symmetric encryption key”
- Server: “Got it loud and clear. I’ll use this key from now on.”
To explain what’s happening, let me first explain what the terms “key” and “symmetric encryption key” mean.
Imagine two friends named Lena and Max, who want to send secret notes to each other during class. They come up with a plan, agreeing on a secret cipher – cipher means “encryption algorithm” – that goes like this: shift each letter forward by x number of letters in the alphabet.
They decide to shift each letter forward by 3 letters (A -> D, E -> H, F -> I, etc.) In this scenario, the key is the number 3. It’s the secret value that controls how the cipher works. If the key was 4, each letter would be shifted forward by 4 letters.
Lena decides to write the first note. She wants the message to be “MEET AFTER LUNCH”, and she uses the key to encrypt the message. When Max receives the note, it says “PHHW DIWHU OXQFK”. He uses the same key to decrypt the message back into “MEET AFTER LUNCH.”
In this scenario, Lena and Max are using a symmetric encryption key. This means the same key is used to encrypt (encode) and decrypt (decode) data.
This is simple and efficient, but there’s a problem: if anyone discovered the algorithm and the key, they could read all the messages.
During the TLS handshake, the encryption algorithm is sent in plaintext. Anyone intercepting traffic between the client and server can see it. The client and server eventually agree on a symmetric encryption key, but they use a process called asymmetric key encryption to generate that key in a secure way.
Here’s how it works: after the client and server agree on a cipher suite, the server sends the client its digital certificate and a public key. This key is not secret – anyone can access it. The client uses this key to encrypt a message called a pre-master secret. It then sends the encrypted message to the server.
The server receives the message. Rather than using the public key to decrypt the message, it uses a private key. The private key is stored locally on the server. Nobody but the server can access it.
In asymmetric key encryption, the two keys are mathematically linked. Only the public key can encrypt messages. Only the private key can decrypt them.
Let’s revisit what happened:
- The client generated a pre-master secret and encrypted it using the server’s public key.
- The client sent the encrypted message to the server.
- The server received the message and decrypted it using its private key.
- Now the client and server both have the same pre-master secret.
They both plug the pre-master secret into what’s called a Key Derivation Function (KDF), which is a special algorithm that takes in secret material (like a pre-master secret) and produces a symmetric encryption key.
The KDF runs locally on both the client and the server. When the symmetric key is generated, it’s stored locally on both the client and server. It’s never transmitted over the internet. Thus, it is impossible for anyone intercepting traffic between the client and server to see the key.
Because an encryption algorithm is useless without the key, the TLS handshake ensures that encrypted messages sent between the client and server are truly confidential.
Overall, this handshake relies on asymmetric encryption to:
- Agree on the TLS version
- Select a cipher suite for secure communication
- Validate the server’s certificate
- Exchange a symmetric encryption key
I wrote about TLS in step 2, but I’ll cover it with more depth here. It’s a security protocol that encrypts data to ensure privacy, authenticity, and integrity during transmission.
By privacy, I mean confidentiality. TLS encrypts the data sent between your browser and the server so that only the intended recipient can read it. Even if someone intercepts the communication – say, a hacker on the same public Wi-Fi network – they’d only see scrambled, unreadable data. This encryption is made possible through cryptographic keys that are exchanged during the TLS handshake. Without the correct key, the intercepted data is useless.
Authenticity means you’re really talking to the website you think you are. When your browser connects to a server, the server presents a digital certificate. It’s like a digital ID card issued by a trusted third party known as a Certificate Authority (CA). Your browser checks this certificate to verify that the server is genuinely who it claims to be (e.g., that it’s really substack.com and not a malicious imposter). If the certificate checks out, the connection proceeds. If it doesn’t, your browser will warn you.
Integrity ensures the data wasn’t tampered with while in transit. TLS uses cryptographic tools like message authentication codes (MACs) to detect any unauthorized changes. If even a single bit of data is altered between the time it’s sent and the time it’s received, the recipient will know. This protects users from attackers who might try to inject malicious content or corrupt files mid-transmission.
Now that the TCP Connection was established (via the TCP Handshake), and that the TLS protocol will encrypt the data (due to the TLS handshake), the browser is finally ready to send the HTTP request to the server.
Step 5: HTTP Request Sent by Browser
As I mentioned earlier, an HTTP request is the message your browser sends to the web server when it wants something. This is usually a webpage, a file, or data.
An HTTP response is the message the server sends back. It always includes a status code that indicates if the request was successfully handled or not. If handled successfully, the response also includes the resources you’re requesting (like an HTML page or database data.)
This back-and-forth is the core of how the web works. Every time you load a page, click a link, or submit a form, you’re sending one or more HTTP requests and receiving HTTP responses in return.
Anatomy of an HTTP Request
The requests are sent in plaintext. For our specific case – accessing substack.com – the request looks like this:
GET /home HTTP/1.1
Host: substack.com
[Other headers]
The first line is known as the request line. It includes the method (GET), path (/home), and HTTP version. (HTTP/1.1).
All subsequent lines are known as “headers.” In an HTTP request, a header is a key-value pair that gives the server additional information about the request. It might tell the server which device you’re using, what type of content you expect back, or what cookies to include.
Headers are important because they customize and control how requests and responses behave. For example, they can specify your preferred language, manage cookies (I will cover what a cookie is later), or ask the server to use compressed data formats.
The only mandatory header in an HTTP request is the Host header. It tells the server which domain you’re trying to reach, which is important when one server hosts multiple websites.
After the last header, there’s always a blank line. The blank line signals the end of the headers. If the request doesn’t have a body (like most GET requests), the blank line marks the end of the entire request. If the request does have a body, the body comes after the blank line.
Let’s break down the request line:
GET /home HTTP/1.1Method
The HTTP method is the first word in the request. It tells the server what action you want to perform.
I like to think of HTTP methods like commands in a conversation with the server:
| Method | Meaning |
|---|---|
GET | “Can I see this resource?” |
POST | “Here’s some new information – please process it.” |
PUT | “Here’s a full replacement for something.” |
DELETE | “Please remove this thing.” |
For everyday web browsing, the two most common methods are GET and POST:
- A
GETmethod is used to retrieve information from the server. When you visitsubstack.com, your browser sends aGETrequest for its homepage. - A
POSTmethod is used to submit information to the server. This happens when you fill out a form or subscribe to a newsletter.
Here’s what a POST request might look like when submitting a signup form:
POST /subscribe HTTP/1.1
Host: substack.com
Content-Type: application/x-www-form-urlencoded
Content-Length: 42

email=test@example.com&name=Asher+Orr
As I mentioned earlier, the blank line separates the headers from the body.
The body carries the actual data being sent to the server. This request is saying:
“I want to subscribe (
POST), here’s my email and name in the body. Please process it.”
Let’s get back to the request line of the GET request. We just covered its method, and now we’ll look at the next part – the path.
Path
GET /home HTTP/1.1The second part of the request is the path. This is the specific resource being requested from the server.
In this case, the browser is asking for the /home page on substack.com.
Version
GET /home HTTP/1.1The third part tells the server which version of HTTP the client wants to use. In this case, it’s version 1.1.
If the server agrees, it will send the response back using the same version. Later versions, like HTTP/2 and HTTP/3, offer performance improvements, but the core request/response model stays the same.
Common Optional Headers
User Agent Header
This header tells the server what kind of client is making the request. It includes information about your browser, operating system, and device.
For example:
User-Agent: Mozilla/5.0 (Windows NT 10.0; Win64; x64) AppleWebKit/537.36 (KHTML, like Gecko) Chrome/124.0.0.0 Safari/537.36This User-Agent header is telling the server “Hi, I’m a Google Chrome browser running on a Windows 10 64-bit machine.” This helps the server adapt the response. It might avoid features that the browser doesn’t support.
Accept Header
The Accept header tells the server what content types the client is willing to receive in the response. This helps the server tailor the response to match what the client expects or can handle.
Here’s a typical example:
Accept: text/html,application/xhtml+xml,application/xml;q=0.9,*/*;q=0.8Let’s break that down:
text/html: “I prefer regular HTML webpages.”application/xhtml+xml: “I also accept XHTML if that’s what you have.”application/xml;q=0.9: “I’ll take XML too, but it’s slightly less preferred.”*/*;q=0.8: “If you don’t have any of the above, I’ll accept anything else — but that’s my least favorite option.”
The q values (called “quality values”) are like votes: they indicate how strongly the client prefers one format over another on a scale from 0 to 1.
Let’s return to where we are in the big picture.
- We entered a URL into the browser and hit enter. The browser parsed the URL to determine, among other things, what protocol will govern the client-server interaction.
- A DNS lookup occurred to figure out the IP address of
substack.com. Your computer then chose a port and formed a socket (like151.101.1.19:443). - The client established a
TCPconnection with the server via theTCPhandshake. - A
TLShandshake occurred in order to encrypt theHTTPdata that will be sent over this connection. - The client sent the
HTTPGETrequest to thesubstack.comserver.
That’s a lot of steps for just one request!
Before I cover Step 6, in which the server processes the request and sends back resources, I want to discuss that HTTP is stateless. What this means is that each request is totally independent of the others. They do not build on each other. HTTP does not “remember” anything, so to speak.
“OK,” you may be thinking. “If go to substack.com and log in to my account, and I navigate to another page, I’m still logged in to my account. If HTTP is stateless, how do I stay logged in? Wouldn’t I be logged out on the next request?”
Engineers came up with clever workarounds for this problem. The three main workarounds used to simulate state – that is, to give the appearance that HTTP requests and responses can “remember” what happened before – are cookies, sessions, and tokens.
Cookies
Cookies are small pieces of data – specifically key-value pairs – that the server sends to the client. Once received, the client stores the cookies. On every subsequent HTTP request to the same server, the browser automatically includes them using a Cookie header.
Here are some common use cases for cookies:
- Keeping you logged in
- Tracking shopping cart items
- Tracking your behavior for analytics
When the client sends its first HTTP GET request to a server, the server processes the request and decides it wants to associate a cookie with the user. In the HTTP response, it includes a Set-Cookie header.
HTTP/1.1 200 OK
Set-Cookie: session_id=abc123; Path=/; HttpOnly
When the browser receives the response, it sees the Set-Cookie header and stores the cookie. On every future request to the same domain, the browser automatically includes the cookie in a Cookie: header.
Sessions
A “session” refers to data on the server – usually in a file or database – that holds information about a user across multiple HTTP requests
The server will generate a session_id the first time it wants to associate data with a particular client. This typically happens when you log in, add something to your cart, or perform any action that should persist across page loads.
Let’s take another look at the HTTP response below:
HTTP/1.1 200 OK
Set-Cookie: session_id=abc123; Path=/; HttpOnly
The server processed the GET request and set some cookies in the response. One of the cookies is a session ID (abc123).
The client will store this cookie. On future HTTP requests, the client will automatically include a Cookie header with the session ID:
Cookie: session_id=abc123When the server sees this ID, it looks up the session data associated with it and uses that to handle the request. This gives the illusion that HTTP “remembers” who you are – even though the protocol itself is stateless.
As you can see, cookies and sessions often work in tandem. The cookie is stored on the client. Its purpose is to store the session ID. The session is stored by the server, and its purpose is to store user-specific data securely. The combination of cookies and server-side session data is how web apps simulate memory over multiple requests.
Tokens
A token is a self-contained piece of data that includes everything the server needs to verify who you are. Unlike sessions, tokens don’t require server-side storage. All the relevant information is baked into the token itself.
Imagine that you log in to substack.com. If Substack used token-based authentication, the server would generate a signed token that might look like this:
eyJhbGciOi... (a long encoded string)The token is then sent back to the client, which stores it.
For every future request, the client includes the token in the Authorization header. Like this:
Authorization: Bearer <token>When the server receives the request, it verifies the token’s signature to ensure it wasn’t tampered with. It then extracts any data embedded in the token (like your identity or the content of your shopping cart.)
Because all the data lives inside the token, there’s no need to look anything up on the server. This makes tokens ideal for distributed systems. However, they do have trade-offs:
- Once issued, a token can’t be “deleted” like a session. You’d need to implement a token blacklist or set a short expiration time.
- Since all the data is inside the token, it must be stored securely on the client.
That concludes the aside on HTTP being a stateless protocol, and the workarounds used to simulate state. Back to the HTTP GET request from above:
GET /home HTTP/1.1
Host: substack.com
[Other headers]
We covered:
- The anatomy of an HTTP request, which includes:
- the request line (consists of the method, the path, and the HTTP version.)
- the host
- any optional headers
- How
HTTPis a stateless protocol, and what workarounds are available to simulate state inHTTP(cookies, sessions, and tokens.)
Onto the next step: the server’s response!
Step 6: The Server’s Response
When the server receives the GET request, it will send back an HTTP response.
Anatomy of an HTTP Response
The response looks like this:
HTTP/1.1 200 OK
Set-Cookie: session_id=abc123; Path=/; HttpOnly
Content-Type: text/html; charset=UTF-8
Content-Length: 452

<!DOCTYPE html>
<html>
  <head>
    <title>Welcome to Substack</title>
  </head>
  <body>
    <h1>Hello, Asher!</h1>
    <p>Thanks for visiting our homepage.</p>
  </body>
</html>
Let’s break it down. The first line is known as the status line.
HTTP/1.1 200 OKThe first part- HTTP/1.1 – is known as the HTTP version. This tells the client which version of the HTTP protocol the server is using to respond.
The second part – the 200 – is known as the Status Code. This is a 3-digit code that tells the browser what happened with the request.
Here’s a rundown of most status code types you’ll see:
Categories:
1xx: Informational2xx: Success (e.g. 200 OK, 201 Created)3xx: Redirection (e.g. 301 Moved Permanently, 302 Found)4xx: Client error (e.g. 404 Not Found, 403 Forbidden)5xx: Server error (e.g. 500 Internal Server Error)
The third part – the OK – is known as the Reason Phrase.
This is a short, human-readable explanation of the status code. It’s optional. Here are some you may have already seen before:
404 Not Found301 Moved Permanently500 Internal Server Error
Below the status line are the headers:
HTTP/1.1 200 OK
Set-Cookie: session_id=abc123; Path=/; HttpOnly
Content-Type: text/html; charset=UTF-8
Content-Length: 452
Like the HTTP request, these headers contain information the machine on the receiving end can use. This particular response sets a cookie (session_id=abc123), specifies that the content type is HTML (text/html; charset=UTF-8), and indicates that the length of the response body is 452 bytes.
After a blank line, the body begins:
HTTP/1.1 200 OK
Set-Cookie: session_id=abc123; Path=/; HttpOnly
Content-Type: text/html; charset=UTF-8
Content-Length: 452

<!DOCTYPE html>
<html>
  <head>
    <title>Welcome to Substack</title>
  </head>
  <body>
    <h1>Hello, Asher!</h1>
    <p>Thanks for visiting our homepage.</p>
  </body>
</html>
This responses’ body contains raw HTML, which is a language your browser can use to render the webpage on your screen. However, note that the body can contain any language that is needed to display whatever resource you’re trying to get from the server – like videos, images, etc.
Step 6 Aside: Asynchronous Web Apps & AJAX
We’ve covered how a client requests resources from a server, via an HTTP request, each time you visit a new webpage. However, sometimes web pages behave like HTTP requests and responses are being sent back and forth without visiting a new webpage.
For example, imagine you’re on Facebook. You scroll down, and you’re served up new information. Or you see likes on someone’s photo appear in real time. You didn’t visit a new webpage in either situation. How is this happening? It’s through the use of a technology called AJAX (Asynchronous JavaScript and XML)
When a webpage uses AJAX, the initial page that the browser loads contains not just HTML, but JavaScript code as well. That JavaScript code includes logic to make HTTP requests in the background. The server will send back responses, and once they arrive, JavaScript inserts or updates parts of the page with the new content. This enables features like real-time notifications and auto-saving.
Step 7: Browser receives and renders the response
At this point, the browser receives the response. It takes the data in the body of the HTTP response and uses it to render Substack’s homepage on your screen.
I want to include two final sections to help solidify your understanding of how the internet works. The first covers a concept called “Encapsulation” in networking, which is a foundational concept that has enabled the web to grow and scale as rapidly as it has.
The second section covers security threats HTTP is vulnerable to, and how developers can design applications to minimize these threats.
Encapsulation
Earlier in this article, you followed the story of what happens when you type substack.com into your browser and press enter. You saw a chain of events unfold: the DNS lookup, the TCP handshake, the TLS encryption, the sending of the HTTP request, and the server’s response. That was the chronological view – a timeline of everything that needs to happen for your browser to load a page.
Now, let’s switch lenses. Instead of looking at when things happen, we’re going to look at how your data is actually packaged and prepared for travel across the network. This is where the concept of encapsulation comes in.
As data moves through the layers of your computer’s networking stack – from the browser down to the physical hardware – each layer encases the data in its own set of instructions. These instructions live in what’s called a header, which is prepended to the data before it’s handed off to the next layer.
Each layer focuses only on its own job, adding just enough information to do it, and then passes the result downward. This wrapping process is known as encapsulation.
Encapsulation allows complex systems to work modularly. Each layer encases the data it receives, does its part, and hands it off. This is why you can browse the web, send email, or transfer files – all using different protocols – without needing to change the underlying network infrastructure. It doesn’t matter what’s happening above or below a certain layer. This design makes modern networking scalable, flexible, and robust.
Let’s say you’re sending a request to load substack.com. Here’s how encapsulation works in practice:
What Happens After You Hit “Enter”?
You open your browser, type substack.com, and hit enter. As you saw earlier in the article, that action sets off a chain of events: a DNS lookup, a TCP connection, a TLS handshake, and ultimately an HTTP request being sent to Substack’s servers.
Now, let’s zoom in on that request’s journey from a different perspective – not what happens step-by-step in time, but what happens to the data itself as it moves through your machine and out onto the internet.
This new view is best understood through the TCP/IP model, which organizes the data’s journey into four “layers.” Each layer has a specific job. Together, they describe how your HTTP request is encapsulated to ensure it reaches its destination and can be properly understood.
Application Layer: Making the Request
The moment you hit enter, your browser constructs an HTTP GET request asking for Substack’s homepage. This takes place at the Application Layer, the highest layer in the TCP/IP model. This layer isn’t a physical place. It’s an abstraction that represents the processes by which all kinds of applications that use the internet – like email clients, file transfer tools, messaging apps, and browsers – format, interpret, and prepare data for exchange over the network.
Here’s a simplified version of the HTTP request your browser sends:
GET /home HTTP/1.1
Host: substack.com
At this point, the message exists only in your browser’s memory. Before it can be sent, it needs to be prepared by the other layers for delivery.
Transport Layer: Segmenting and Managing the Conversation
The HTTP message is then handed down to the Transport Layer. This layer represents the processes which establish and manage the connection between your device and Substack’s server.
Remember that each layer encapsulates the data by prepending a header to it. The transport layer’s header includes all the information related to transporting the message over the internet.
The exact information will vary depending on the protocol(s) used at this layer. However, since our request to Substack uses the TCP protocol, the header will contain this information:
- Source and destination port numbers
- Sequence numbers (to reassemble data in the right order)
- Error-checking mechanisms
Since the protocol used is TCP, the header itself is known as a “TCP Header.”
When the data is encapsulated at this layer, the entire data unit – the application layer data encased in a transport layer header – is called a segment
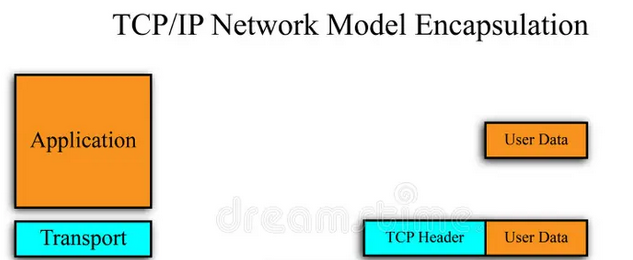
- Image credit: https://www.dreamstime.com/stock-photo-tcp-ip-network-model-image28867280
Network Layer: Addressing and Routing the Packet
The segment is then handed off to the Network Layer, where another header is prepended to the data – this time forming what’s called an IP packet.
At this layer, the data is labeled with the source and destination IP addresses. These are like return and destination addresses on a letter – they tell the internet where the data came from and where it needs to go.
This information is critical for a special kind of device called a router. Routers are the machines that sit between networks, and they act like traffic controllers. Each time your packet reaches a router, the router checks the destination IP address and decides which direction to send it next. The packet may pass through several routers on its way to the destination.
This is the second layer of encapsulation. Thanks to the IP header, the packet now has enough information to be routed across the internet.
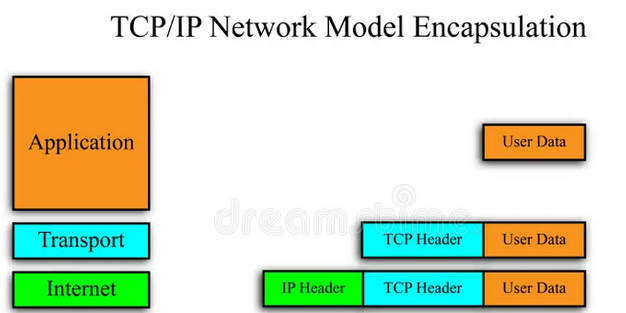
- Image credit: https://www.dreamstime.com/stock-photo-tcp-ip-network-model-image28867280
- Note that the Network Layer is sometimes referred to as the “Internet” Layer.
Network Interface Layer: Preparing for Local Travel
The IP packet is passed to the Network Interface Layer, which prepares the data for travel across your local network.
The Ethernet protocol is widely used at this layer, and it’s the protocol used at this layer in our example. To encapsulate the existing data, this layer prepends an Ethernet Header to the data.
The Ethernet Header contains the source and destination MAC addresses. MAC addresses are unique IDs that identify each device on a local network. By adding the source and destination MAC addresses, the header ensures the data can reach the next device on the local network – like your router.
At this layer, an Ethernet Footer is also appended to the end of the data. I won’t get into detail about its purpose, but know that it provides error detection for data transmitted across a network.
Once the data is encapsulated with the header and footer at this layer, it becomes a frame – the standard data unit used at the Network Interface Layer. I want to clarify here that terms like segment, packet, and frame are simply labels we use to describe encapsulated data at different layers of the networking stack.
This is the final encapsulation step. Now your message is wrapped in all the necessary headers and footers. It’s then converted into raw signals (like electrical pulses or Wi-Fi radio waves) and sent to your local router.
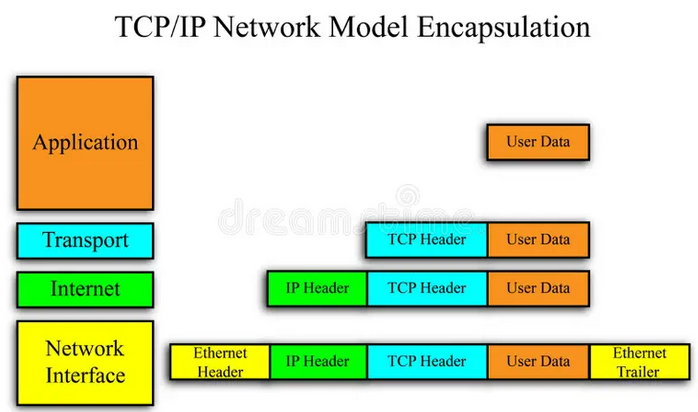
Image credit: https://www.dreamstime.com/stock-photo-tcp-ip-network-model-image28867280
A Different Lens on the Same Journey
It’s important to remember that this is not a new process. It’s what was happening all along when you typed in substack.com and hit Enter. Encapsulation is just an under-the-hood view detailing how your HTTP request was packaged for transport.
Each layer – Application, Transport, Network, and Network Interface – added the right information to ensure the data could get from your browser to Substack’s server.
How the Packet Moves Through the Network
What happens after the encapsulated data is converted into raw signals and sent to your local router?
- The router inspects the IP header inside the data.
- It determines the next router to forward the data to. It does not touch the
TCPsegment orHTTPmessage. Those remain sealed. - The router removes and replaces the frame so that the MAC address of the next router can be included. To do this, it looks up the IP address of the next router, then it sends that router a request to obtain its MAC address.
- It forwards the encapsulated data.
This process may repeat across multiple routers.
Arrival at the Server: Decapsulation Begins
Before your request ever touches Substack’s server – as you saw above – it must first pass through several routers on the public internet. Eventually, it reaches a gateway router. This is a specialized router at the edge of Substack’s network. This router acts like a front door to their private infrastructure. It inspects the IP address in your packet and determines which internal server should receive it. Only then is the request forwarded into Substack’s local network, where it finally arrives at the specific server that’s meant to handle it.
When your request finally reaches Substack’s server, it’s like a package arriving at its destination. Just as you’d unwrap a gift, the server starts a process called decapsulation. This process unwraps your request, layer by layer.
Here’s how the unwrapping happens:
- The server’s hardware first receives the incoming signals and puts them back into a frame. It checks the MAC address embedded in the frame to make sure it matches its own MAC address, verifying that the gateway router sent the data to the correct server. Once confirmed, it removes the frame.
- Next, the server examines the packet to check the IP address. It sees that this address matches its own, which confirms that the message has arrived at its final stop on the internet. It then removes the packet.
- The server has unwrapped the frame and packet, which leaves it with the segment. The segment contains the port number, which tells the server which specific port will handle the request. The server then removes the segment.
- Now that the frame, packet, and segment have been removed, the only data left is the original
HTTPrequest. Your message – “Hey, please show me the homepage!” – is received by Substack’s web server, and it begins preparing the response for you.
At this point, your original message has been encapsulated, successfully traveled across the internet, and then decapsulated by the Substack server.
When the server creates its response, it will be encapsulated and sent across the internet to your device. When the response reaches your device, decapsulation occurs.
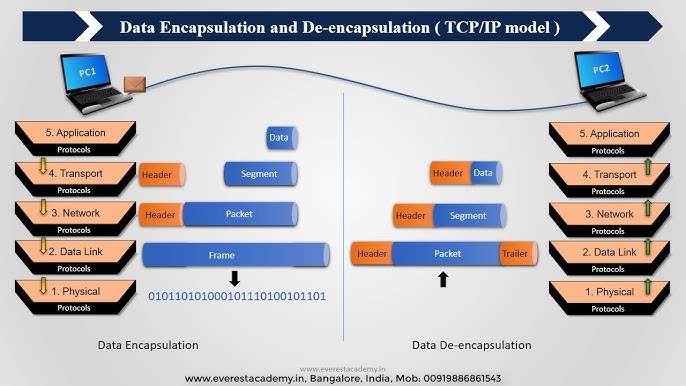
Image credit: Everest Academy
- Note that the Network Interface Layer is sometimes called the “Data Link Layer”, and that people sometimes add a “Physical” layer to illustrate that the encapsulated data is eventually converted to bits.
Why Encapsulation Matters
Here’s the key insight: each layer operates independently.
For example, the Transport Layer doesn’t care what kind of application data it’s carrying. The Network Layer doesn’t know (or need to know) whether it’s routing a video stream or a web page – it just delivers packets. The Network Interface Layer focuses only on moving frames across a local network.
This separation of concerns makes the internet modular and flexible. You can upgrade or replace one protocol without rewriting the entire system. It’s a foundational reason why the internet has been able to scale and evolve so rapidly.
Final section: HTTP Security Threats & Mitigation Techniques
Earlier, I explained how HTTPS is a major security improvement over HTTP. Let’s look at three common security threats associated with HTTP and how developers can defend against them.
Session Hijacking
Session Hijacking is when an attacker steals a user’s session ID and uses it to impersonate the user.
This often happens when cookies are sent unencrypted over HTTP and are intercepted by an attacker on the same network. This is why HTTPS is critical – it encrypts data sent over HTTP.
To mitigate this attack, use HTTPS to encrypt session cookies in transit (if you’re using Firefox, there’s a great extension called HTTPS Everywhere.)
It’s also a good idea, from a design perspective, to generate new session IDs after each login.
Cross-Site Scripting (XSS)
Cross-Site Scripting (XSS) is an attack where an attacker injects malicious JavaScript into a web page, which then runs in the victim’s browser.
If an attacker can successfully execute XSS, they can wreak havoc on applications. They can redirect users to malicious pages, send requests on a user’s behalf, access cookies, deface websites, and even log keystrokes.
XSS is one of the most common and dangerous web vulnerabilities. To prevent this type of attack, developers need to validate all user input. If someone enters text into a form or uploads an image, the application should check that it’s not a script.
Another mitigation strategy is to restrict where scripts can load from on the application itself.
Same Origin Policy
The Same-Origin Policy is a browser-enforced security mechanism that prevents scripts on one origin – defined as a combination of a page’s protocol, domain (host), and port number – from accessing data from another origin.
Without this rule, malicious scripts from a site like example1.com could freely snoop on what you’re doing on example2.com. They could read sensitive data, steal session IDs, or capture login credentials.
If you’ve ever worried whether a website in one tab could tell what was happening in another tab, this is precisely what the Same-Origin Policy prevents.
Most browsers enforce this policy by default, but developers should still avoid implementing overly permissive CORS (Cross-Origin Resource Sharing) configurations in their apps. They can unintentionally open up vulnerabilities by allowing cross-origin requests that shouldn’t be allowed.
This article only scratches the surface of how the internet works. There are deeper layers and advanced mechanisms at play, but my goal was to give you a solid conceptual foundation. With this, you can explore even more advanced topics now.
Leave a Reply